Wine Chemistry Day

I’ve been meaning to set up a free SO2 aeration/oxidation (A/O) system for a while to test our wines. I’ve mentioned before that the “quick tests” are difficult to read (especially for red wines, since it relies on a color change in the purple range) and are notoriously inaccurate. From the information I could find, the A/O method is generally 2-5% accurate (if all components are fresh and correctly made), whereas the “Ripper” method (which the quick tests use) are typically off by 10 ppm. Today was finally the day to get it together and start checking the wines. As a recently unemployed scientist, it was good to put together a little home lab and use a pipettor again.
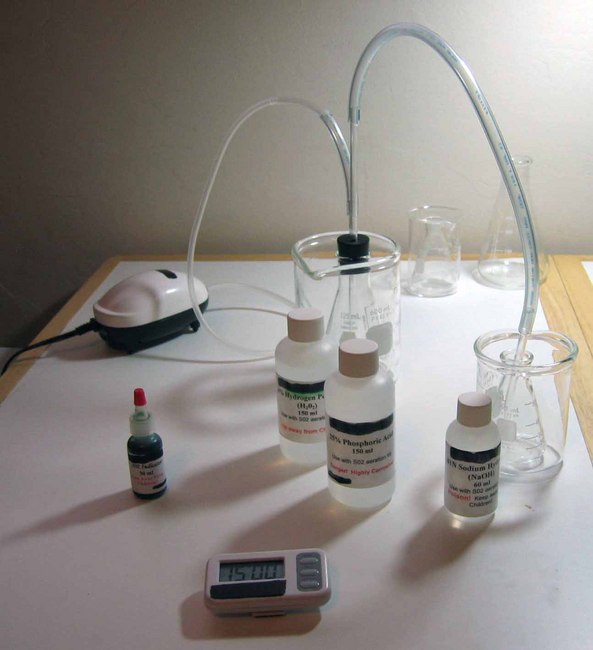
The set up involves:
- pump — the air flow rate should be 1 L/min, most aquarium pumps are close enough to this; basically you just need to be sure gas passing through the H2O2 solution has time to react to form H2SO4 proportional to free SO2 released
- closed sample container — I used a 125 mL erlenmyer flask with a 2-hole stopper in the top. I poked a pipet through so that the side running directly to the pump would reach to the bottom of the flask, and the other side would then feed into the next part —
- receiving container — pretty much anything works here, it doesn’t need to be sealed, you just want to be able to bubble into this without it splashing out. I used a 50 mL flask here, but a tube would have been fine.
- Several solutions, including an indicator solution, hydrogen peroxide (H2O2), phosphoric acid (H3PO4), and sodium hydroxide (NaOH). Mine are new and haven’t been opened yet, but ideally you want to make fresh 0.3% H2O2 solution every time, or keep it cold immediately after using it. Also, the 0.01 N NaOH solution should be freshly diluted and titrate it with potassium acid phthalate to be the most accurate.
First, H2O2 is put into the last container, the receiving container.
A few drops of indicator solution is added to this, then a drop or two of NaOH is added until the solution is a bright green (depending on the indicator; it might also be a bright blue or yellow).
Wine is put into the closed sample container, and then phosphoric acid is added to it. The stopper with the 2 lines is inserted, so that one line attaches to the pump, and the other ends directly into the bottom of the H2O2 solution. The pump is then turned on, and air is pushed through the system for 15 minutes.
The H2O2 receiving flask turned from bright green to bright purple pretty quickly. As it bubbles through, it smells really nice — like a wine air freshener. All of the wines smelled fine, no off-odors or signs of things going wrong; also no more signs of weird white top layers on anything (yay!). I also checked the pH of all of the wines, since this affects the amount of free SO2 you ultimately want.
I checked both carboys of the syrah, and both had the same readings. I also checked one carboy of the primitivo, as well as one carboy of each of the petite sirah and merlot that was residing in the shower.
The numbers are:
Syrah: pH 3.5, free SO2 ~8 ppm; low, but low enough to try to start MLF again.
Primitivo: pH 3.68, free SO2 = 14.4 ppm. That pH is a little high, but higher than last time I checked; I’ll test it again after I rack it next time to see if it’s still too high.
Petite Sirah: pH 3.76, free SO2 = 24 ppm. That pH is really high, so we might need to do some adjustments.
Merlot: pH 3.6, free SO2 = 13 ppm.
So, all of the wines have pretty low free SO2; optimal range is 25 – 40 ppm, and varies with the pH. They all need to be racked off of their lees again and tasted for oak, so I’ll probably add a bit of Kmeta then. I also need to get samples from the barrels and test them, too.